Knowing how to set up a guest network on your wireless router is a very important step in keeping your main network safe from viruses and malware. It also helps visitors to have free internet access without needing you to share the password of your main network.
Are you tired of sharing your main network password with visitors, or do you want to keep your network or device safe from unauthorized access, viruses and malware? Knowing how to set up a guest network on your wireless router is the perfect answer to your question. In this article, we’ll be looking at some of the steps you can take on how to set up a guest network on your wireless router.
How To Set Up A Guest Network On Your Wireless Router
Before we look at some of the steps you can take on how to set up a guest network on your wireless network, let’s have a good understanding of what a guest network is.
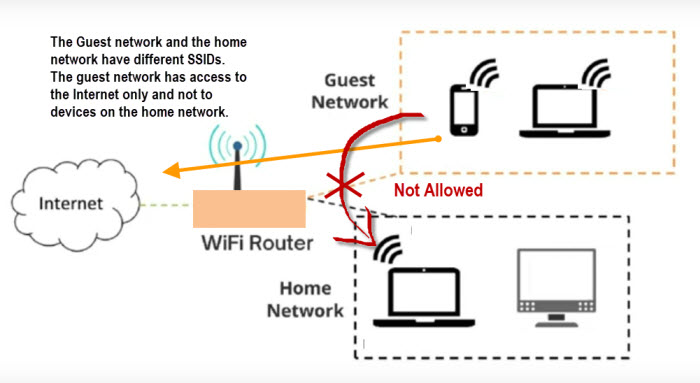
A guest network is a type of network that gives you the platform to provide internet access to guests while ensuring that your main network and devices are safe and secure. Up to 50 devices can be connected to a guest network. Setting up a wireless router for your guest network would not leave room for your data to be stolen or potential malware and viruses that can infect your device or network.
Let’s look at some of the easy steps you can follow to set up a guest network on your wireless router.
1. Log in to Your Wireless Router
The first step here is to log in to your wireless router. You can do this by opening the web browser on your phone or laptop device and typing the IP address of your router. After typing the IP address of your router, you can now log in with your admin username and password.
2. Search For The Guest Network Settings
The next step here on how to set up a guest network for your wireless router is to search for “Guest Network” or “Visitor Network” in your router’s settings.
3. Enable Guest Network
When you’ve seen the guest network settings, the next step is for you to click on the icon or switch to enable the guest network. You may need to click “Save” to confirm that the guest network has been enabled.
4. Create Your Own Guest Network Name
After enabling the guest network, the next step is for you to be able to create your own unique guest network name. This would make it easier for visitors to access your network.
5. Create A Strong Password For Your Guest Network
Creating a strong password for your guest network would make it secure. Create a strong password for your network. It should be a mix of numbers, letters and symbols, and it should be something your guests can easily recall.
6. Save and Apply All Changes Made
The next step here is for you to save all the changes made and apply them to your router. After doing this, your guest network is ready to use.
Conclusion
In conclusion, we’ve looked at 6 easy steps on how to set up a guest network on your wireless router. Setting up a guest network on your wireless router is a very simple and effective way to provide internet access to visitors while keeping your main network secure.
If you follow these six simple steps listed above, you’ll be able to create an isolated network for guests, which would ensure the privacy and security of your device.