Low-light photos are a great way to capture the beauty and mystery of night scenes. Low-light settings can produce stunning visuals. It takes creativity and a creative approach to master this art. This guide explores tips and tricks to help you improve your low-light photos. These techniques can help elevate the quality of your work, whether you’re a novice or a seasoned Tampa photographer.
1. Understand Your Camera Settings
The manual mode of your camera is crucial for low-light shooting. Automatic settings have difficulty balancing exposure, ISO, or shutter speed when the environment is dim. Here are the settings to concentrate on:
- ISO: Set the ISO at a low setting to minimize background noise. As it gets darker, slowly increase the ISO until you achieve the correct exposure. While most cameras today can handle high ISO levels with ease, it is important to test your camera’s limit to avoid grainy photographs.
- Speed of shutter: A slower shutter allows more light through the sensor. It is very useful for taking night photos, but you should be aware that slower speeds are more likely to cause motion blur. To get the best results, use a camera tripod.
- Wide aperture: Use a smaller f-number to let in more lighting. Lenses with apertures such as F/1.4 or F/2.8 are perfect for low-light scenarios.
See also: How Pressure Washing Can Prolong The Life Of Your Atlanta Property?
Investing In The Right Gear
The right tools can be a game changer in your journey into low-light photography. Consider these essential equipment items:
- Tripod: A tripod with a solid base is necessary for low-light shooting. It stabilizes and prevents blurry images caused by camera movement during long exposures.
- Wireless Shutter Release: This accessory prevents camera shake when pressing the shutter. You can also use your camera timer.
- Fast Optics: Prime lenses that allow a lot of light to enter the sensor are excellent in low-light environments.
- External lighting or flash: A portable or external flash device is useful when ambient or natural light levels are insufficient.
- Utilize Available Light
Low-light photographs don’t necessarily mean total darkness. You should also consider other light sources, like candles, neon lights, streetlights, and the moon. These light sources can add mood, depth, and texture to your images. Play around with their placement and intensity to create the desired effect.
Mastering Long Exposures
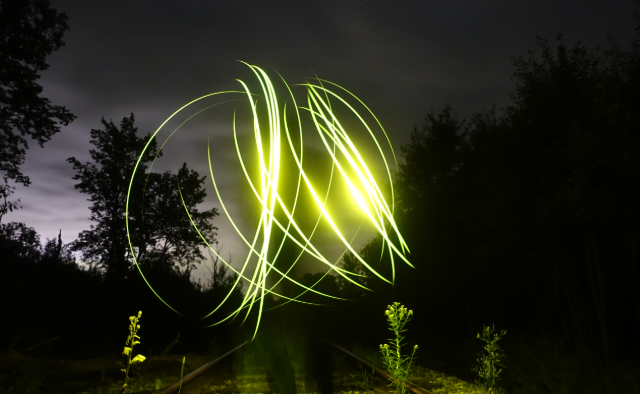
Long-exposure photos are a great technique for low-light scenarios. You can allow the camera more light. By leaving the shutter open for long periods, this technique can be used to capture:
- Long Exposures: Long exposures are used for moving vehicles to create light trails.
- Stars for Astrophotography: The tripod and long exposure are important to capture the beauty in the night sky.
- Water & Landscapes: Increase shutter speeds to slow down water and emphasize landscapes captured at night.
Tools For Post-Processing
Editing plays an important role in improving photographs taken under low light. Use software to adjust noise levels, brightness, and contrast. Key adjustments include the following:
- Noise Control: Reducing the graininess of high ISO settings using noise reduction software.
- Darkness and Lightness: Find the right balance between dark and light to reveal details.
- Color correction: Adjusting the white balance will ensure accurate color display.
Editing is not an aid but a way to express your creativity. Your adjustments should enhance rather than overwhelm an image’s natural beauty.
Experiment Composition
Low-light environments offer unique compositional opportunities. Focus on
- Leading lines: Use pathways or light trails, as well as architectural features, to guide viewers’ eyes around the picture.
- Refractions: Use glass, puddles of water, or other reflective surfaces to create dynamic compositions.
- Silhouettes: Backlit Subjects create striking silhouettes with brighter backgrounds.
- Negative Spacing: Bring the darkness into your compositions by incorporating the negative space.
- Practice Patience By Experimenting
Low-light photographs often require patience and trial and error. Each scene is unique, so it can take time to find the best balance between settings and composition. Don’t be afraid to take multiple pictures with varying angles, exposures, and perspectives. Review your results as you go to make any adjustments.
Conclusion
For low-light photographers, it takes patience, dedication, and the willingness to experiment to become proficient. You can create amazing night shots by learning how to use your camera, investing in quality gear, and using techniques like long exposures and composition. Low-lighting photography allows you to create a visual story, capturing nightlife in the city, natural landscapes, creative expressions, or even artistic expressions. With patience and practice, you can learn to take stunning photos that stand out.